Category Archives: Home Decor

Candle Jars: Vinyl as a Stencil

Hi again, it’s Kaysi from Keeping it Simple!
Today I am going to share with you how I used vinyl as stencil on some glasses vases I got from the dollar store.  I love the look of these vases and the designs that they have now!
living room (21)
This is how I made it:
I took a vase and then I cut several 12” strips of vinyl.  The width of them varied from 1/4” to 1/2”
frosted glass vase (1)
I then put the vinyl around the vase, making sure to push down hard to get all the air bubbles out.
frosted glass vase (2)
Then using some frosting paint, I spray painted the vase all around.
frosted glass vase (3)
Once the paint was completely dry, I peeled off the vinyl.
frosted glass vase (4)
I added a little tea light to it.  And that’s it, super easy and simple.
frosted glass vase (5)
I liked the look so much that I decided to do the same thing to a couple other vases and just used spray paint for some added color!
master suite reveal (22)
Thanks for having me here today!
I would love it if you followed along.

Leave a comment

Filed under Design Team, Home Decor, Sticky Stencils

Lucky as Can Be St. Patricks Sign

In trying to keep with my Lucky theme for my St. Patrick’s Day decor I made this little Lucky board to sit on my shelf.  This one is so super simple and quick!

Lucky wood board

First start with a board and paint it white.  Then pick a really cute piece of cardstock and cut it to the size you want.  Then using Mod Podge adhere it to your board.  Here is my board with my cute paper

Wait for the Mod Podge to dry then add a cute vinyl word.  My vinyl says “Lucky as can be!!”

Add some Mod Podge over the top to seal everything together and let dry.  I think this turned out so cute and took no time at all!

Lucky wood board

If you liked this you may want to check out my Lucky wood blocks as well.

Summer is the author and owner of Summer Scraps.  She is constantly inspired by her 3 kids and has great support from her husband.  In her spare time she enjoys cooking, reading, watching movies and has a secret passion for video games.  Summer loves to share crafts and recipes.  You can also find Summer on FacebookTwitter and Pinterest and at her Etsy shop.

Leave a comment

Filed under Design Team, Home Decor, Seasonal

Adding Vinyl to Accent your Chalkboards

I love Chalkboards! I love words and so chalkboards are the perfect solution for me. If I didn’t have them, I would be one of those people who hung words all over the house using construction paper and scotch tape.

Pin It

If you are not sure how to make a chalkboard, I tell you how to do it here. It really is easier than you think.

I wanted my chalkboard to have a little something extra and unique detail. So, I added a little bit of vinyl love. I have done this a couple of times and every time I do it, I love it more and more.

Supplies Needed:
Chalkboard
Vinyl ( I love Vinyl Outlet.net)
Cricut Mini or your shape printed on some paper & scissors
Chalk and wet rag (to use as an eraser)
Directions:
I cut out a simple #1 to fit in the corner of my chalkboard. When you are deciding what vinyl shape to put on your chalkboard, take your chalkboard size into consideration. This chalkboard is not huge, so I made sure my vinyl was cut to size. After you have cut out your vinyl decal, you just need to attach it to your board. I used transfer tape to make the application super simple.
Voila!

Now that you have your chalkboard all decked out and you are not sure what to write on your board-I have a hundreds of quotes on my Chalkboard Quotes Board on Pinterest. 

If you are wanting some simple tips on how to write on your chalkboard-I did a whole post all about this as well. Simple, life changing tips. (Well not really life changing, but you get the idea)

If you want more simple project ideas, DIY and decorating tips and tricks, please visit my blog

Tausha

Leave a comment

Filed under Chalkboard Vinyl, Design Team, Home Decor

Snowflake Windows by Kaysi

Hi!  It’s Kaysi from Keeping it Simple.
Taking down Christmas this year made my house look so bare.  I had the tree right in front of this window and when I took it down, it was so boring.  I just had to do something with it.   I love the look of snowflakes, they are just so pretty, so I just took some white vinyl and cut out a bunch of different snowflakes and put it onto my window.
snowflakes (1)
I love how they look on my window.
snowflakes (2)
snowflakes (3)
Thanks for having me today!

1 Comment

Filed under Design Team, Home Decor, Kids Crafts

Winter Subway Tile by Kaysi

Hi!  It’s Kaysi from Keeping it Simple again.
Now that Christmas is over, it’s time to start thinking about the next three months: winter.  It’s a hard time and sometimes depressing, so I like to decorate for it with bright turquoise and red and try to make the best of it.  One of my favorite things to use with vinyl are tiles.  They are so inexpensive, so easy to use and look great.  One of the best parts is that you don’t have to paint them, they are just ready to put some vinyl on them.
With a 12×12 tile, I made some winter subway art with all the things that remind of me winter.
winter tile (1)
I just love the colors together!
winter tile (2)
It was super easy to make, I have one for every holiday!
Thanks for having me again!

I would love it if you followed along.

Leave a comment

Filed under Design Team, Home Decor, Seasonal

Joy Blocks with the Cub Scouts

I work with the Cub Scouts in my area and last week we decided to make a present the Cubs could give their mothers.  I wanted something cute that the mothers would love to use, yet something easy for the boys to put together.  We decided to make these cute Joy Blocks (sorry for the picture quality – the lighting was not great)

I pre-painted the blocks black.  Last year we let the boys paint and while they did do a good job it took forever to dry.

I cut a vinyl J and Y out of the metallic red vinyl and covered it with transfer tape.

After a demonstration from me the boys applied the vinyl letters to their blocks.

The boys then tied a red ribbon on the bell.  After that was done they wrapped the Joy block set in celophane wrap and curly ribbon. They were very excited to give them to their moms!

Summer is the author and owner of Summer Scraps.  She is constantly inspired by her 3 kids and has great support from her husband.  In her spare time she enjoys cooking, reading, watching movies and has a secret passion for video games.  Summer loves to share crafts and recipes.  You can also find Summer on Facebook, Twitter and Pinterest and at her Etsy shop.

Leave a comment

Filed under Design Team, Gift Ideas, Home Decor

Simple Noel Plates for Holiday Decorating

I  know that I am not the only one who is intrigued when the title has simple in it. Right?

It seems like all we do this time of year is run, run, run & run some more. We love the idea of giving a handmade gift to friends, neighbors, or co-workers, just not all the time and effort it would require.

noel vinyl plates tutorial with Sassy Style Redesign

Am I right? Well, today is your lucky day! I have a truly simple project that will take minutes to do and the results look like you took forever. Everyone will be wondering how in the world you have time to look so fabulousand have time to make a homemade gift that doesn’t look like your 5 yr. old helped.

Interested?

First you need to gather all of your supplies.

noel plate supplies

4 White Plates-I used this design from Zion Mercantile because it’s versatile & I love it, but you could use whatever you want.
Vinyl-I used this fabulous glitter/red vinyl by Vinyloutlet.net (you can even emboss on this vinyl-it rocks)
A cutting machine-I used a Silhouette. You could use a Cricut or even Google images and a pair of scissors. If you really want a Sillouhette-you must check out this deal!
Because I used a Sillouhette, I chose my fonts online and cut them out. However, if you are using a Cricut, don’t stress, just use some fonts that you already have. If you are Google imaging it, this part is easy. Just find the font you want, size it in a word type document and print.
noel plates step 2
Once you have your letters cut out on the vinyl, all you need to do is apply. I am pretty sure that you know how to do this but, just in case, I took a picture.

noel plates step 3 L

Now that you have adhered all of your vinyl letters, you are good to go. I told you that it was easy!

noel plates tutorial finished close

These are darling hung on a wall, or displayed with plate holders. (dollar store) You are going to be the talk of the town if you not only make them, but give them as well.

noel plates tutorial finished 3

Easy gifts rock, but easy gifts that take 10 minutes & make the recipient feel  loved are Fantastic!


For more fun, simple DIY & just plain inspiring stuff, head over and visit Tausha at her blog

Leave a comment

Filed under Decorate Everything, Design Team, Home Decor, In the Kitchen, Seasonal

Nativity 4×4 Blocks

Hi, it’s Kaysi from Keeping it Simple again.  I’m so excited to be here today!
With all of the commercial things about Christmas, Santa and gift giving, sometimes we forget why we celebrate the season. My sweet friend made me a block like this last year and I loved it so much that I wanted to make some for my friends.  There are 6 sides that go with the story of birth of Christ.
I just took a 4×4, cut it into a square and then painted it red.  Then I cut the nativity images out of white vinyl.
Here are the 6 sides:
nativity block (3)
nativity block (2)
nativity block (1)
I plan on having my kids help tell the story and find the image that represents the part of the story that is being told.
Merry Christmas to you all!  Thanks for having me again!
I would love it if you followed along.

Keeping It Simple Photobucket Keeping It Simple Keeping It Simple

Leave a comment

Filed under Design Team, Gift Ideas, Home Decor, Seasonal

Metallic Vinyl Holiday Decor

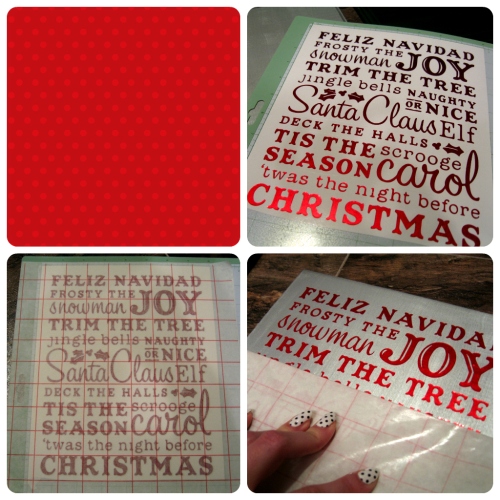
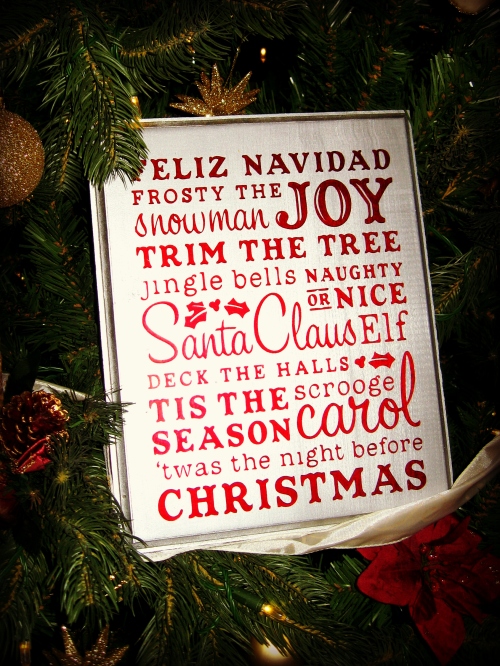
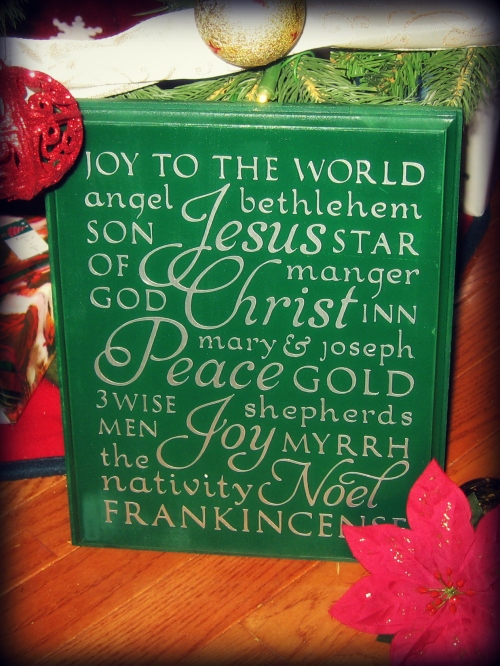
It’s Laura here, from KOLA Designs, with another project using one of my favorite Brookie Craft materials – metallic vinyl!! I love the look of “subway art” and wanted to do some Christmas decorations using some great artwork from the Word Collage Cricut cartridge.  These two designs both cut so well using the metallic vinyl (the settings I used on the Cricut were speed: 5, pressure: 3, blade depth: 4, but keep in mind each machine is a little different, and everyone develops their own preferences when it comes to cutting vinyl)  🙂


My plaques were cut out of scrap wood at about 10″ x 12″ and then spray painted.  Once they were dry, I used Brookie Craft’s transfer tape to lift my design from the vinyl backing and right onto the plaque.  The more detail you have in your design, the slower you’ll wanted to go when removing your transfer tape, just to be sure those little letters and details are sticking to your project and not the transfer tape.  Burnishing the entire area very well helps, but you’ll always want to keep an eye out for stow-a-ways on the transfer tape! 😉


Hope you’ve found some inspiration for your own holiday decorations or gifts!!

Thanks for stopping by!! Would love it if you’d follow my own blog at Kola Designs.

Leave a comment

Filed under Design Team, Home Decor, Seasonal

Holiday Plate

Hi, it’s Kaysi from Keeping it Simple.  It’s amazing how vinyl can really transform something plain and boring and make it into some so pretty and festive.  Every holiday I make a vinyl plate and put it on top of my piano.  Here is the one that I made for Christmas:
Christmas Plate (1)
I just took a regular plate, an old one that we don’t use much anymore.  Then I spray painted it red.
Thanksgiving plate (1)
Added some green and white vinyl.
Christmas Plate (2)
And now I have a pretty Christmas plate that cost me next to nothing!
Christmas Plate (1)
Thanks for having me today!
I would love it if you followed along.
Keeping It Simple Photobucket Keeping It Simple Keeping It Simple

Leave a comment

Filed under Design Team, Home Decor, In the Kitchen