Monthly Archives: January 2013

Adding Vinyl to Accent your Chalkboards

I love Chalkboards! I love words and so chalkboards are the perfect solution for me. If I didn’t have them, I would be one of those people who hung words all over the house using construction paper and scotch tape.

Pin It

If you are not sure how to make a chalkboard, I tell you how to do it here. It really is easier than you think.

I wanted my chalkboard to have a little something extra and unique detail. So, I added a little bit of vinyl love. I have done this a couple of times and every time I do it, I love it more and more.

Supplies Needed:
Chalkboard
Vinyl ( I love Vinyl Outlet.net)
Cricut Mini or your shape printed on some paper & scissors
Chalk and wet rag (to use as an eraser)
Directions:
I cut out a simple #1 to fit in the corner of my chalkboard. When you are deciding what vinyl shape to put on your chalkboard, take your chalkboard size into consideration. This chalkboard is not huge, so I made sure my vinyl was cut to size. After you have cut out your vinyl decal, you just need to attach it to your board. I used transfer tape to make the application super simple.
Voila!

Now that you have your chalkboard all decked out and you are not sure what to write on your board-I have a hundreds of quotes on my Chalkboard Quotes Board on Pinterest. 

If you are wanting some simple tips on how to write on your chalkboard-I did a whole post all about this as well. Simple, life changing tips. (Well not really life changing, but you get the idea)

If you want more simple project ideas, DIY and decorating tips and tricks, please visit my blog

Tausha

Leave a comment

Filed under Chalkboard Vinyl, Design Team, Home Decor

Snowflake Candles

Before I pull out the Valentine decorations I decided to decorate a little bit for winter.  As part of my winter shelf display I made these cute Snowflake Candles.  The best part was how inexpensive and easy it was to put together!

I bought these candles from the Dollar Tree – so I spent only $3

Then I cut out about 20 snowflakes from white vinyl.  This snowflake design had a small snowflake in the center so I was able to use both pieces.
Place the vinyl snowflakes on the candles.
I like how they look on my winter mantle.
 Check out my blog Summer Scraps to see the other items on my winter mantle – I think it turned out cute!
Summer is the author and owner of Summer Scraps.  She is grateful and constantly inspired by her family. In her spare time she enjoys cooking, reading, watching movies and has a secret passion for video games.  Summer loves to share crafts and recipes.  You can also find Summer on FacebookTwitter and Pinterest and at her Etsy shop.

Leave a comment

Filed under Design Team, Seasonal

Simple Valentines Canvas Decor by Tausha

I heart the day of love! I really do. I love the pink and red candy, the class valentines and the red pancakes I make for breakfast on February 14th.

The only thing that I don’t really love is the decor options that are available to purchase. Wa-waa 😦

I know that I am not the only one who feels this way, so I thought that I would come up with a simple piece of Valentine’s decor! You are excited..right? Wa-hoo!

Pin It
Supplies needed:
Canvas-it’s ok if there is something already on the canvas (painting) because you will cover it up
Paper
Adhesive
White round paper doily
Red heart doily
Red glitter
Junk Bow
“14” cut out of Brookie Vinyl
I love a simple project and this one is no different. It even goes a little bit faster if your kids are in bed and you have a diet coke and some chocolate to keep you company.
Directions
(you are going to want to glitter your heart doily before you start and let it dry overnight.)
1-I covered my canvas (that was previously a craft FAIL) with cute polka dot paper. I then added a strip of old school lined paper. I used double stick tape to adhere it. Worked like a charm.
2- I then added the vinyl 14 that I cut out with my Cricut Mini. I used the Storybook Font.
3- I then adhered the white doily  Some of the doily will fold over the edge of the canvas.That is what you want. I just glued it down on the sides.
4-Add your glittered, red heart, doily. Double stick tape to the rescue again.
5-I love a great junk bow-so that was one of final steps. Not sure what a junk bow is? Don’t worry, I did a whole post about it. You can read about it here. 
6- I used a fine point pen to draw “I love you” & to outline the 14. This is totally optional. So, if you hate your handwriting, no worries.
Done and done! I finished this whole project while watching an episode of Nashville. So, it doesn’t take too long. I hope that you will try this project out. I think that you will really LOVE the results!
If you want to find more simple projects, diy and decorating how to, you can check out my blog:

Tausha 

Leave a comment

Filed under Design Team, Seasonal

Note to Self Dry Erase Board

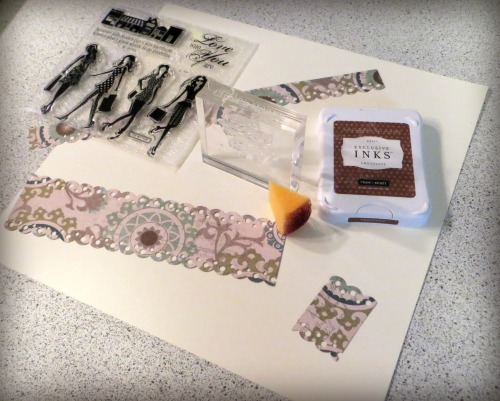
Dry Erase Board NotesLaura here again, from KOLA Designs!  Today I want to share a project that will hopefully help to organize your life, or at least your to-do list!  Today I put together an interchangeable dry erase board using a 12×12″ glass frame, some CTMH paper, stamps, and ink, and a little Brookie Craft Vinyl!
Note to Self Board_Supplies
Step one is to create a design to frame – this will be the background for your dry erase board, so you’ll want to keep it fairly simple, especially for a section to write on.  I used some Colonial White cardstock and accented it with some patterned paper from the Avonlea set.  I added an inspirational quote as well, and after inking the edges, I was ready to put it all together!  This particular frame is perfect for this project because it’s pretty much just glass – only 4 little clips to attach the glass to the back, so they don’t get in the way of anything!
Dry Erase Board Previnyl
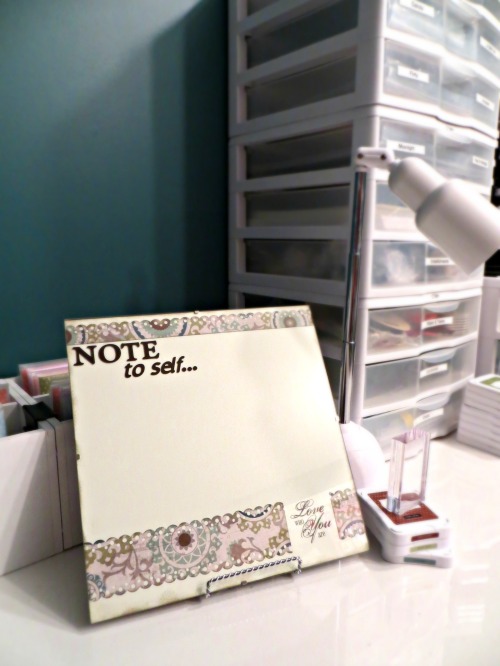
Once I had the board put together, I used my Gypsy to design a quick title (“Note to Self…”) using both CTMH cartridges: Art Philosophy and Artiste.  Use some transfer tape to attach the new vinyl title, and you’re all set!!
Dry Erase Vinyl Cut
You can use this dry erase board on a stand right on your desk, or even hang it on a wall!  Think of the great ways you can use this throughout the year!  Just switch out the background paper to match a holiday or even a different room!

Note to Self Board Complete

Leave a comment

Filed under Design Team, Personalize It

DIY Sticky Stencil Love Sign

Wooden signs are all the rage right now.  They are so easy to make.  I used my Cricut to cut out the word LOVE using a sticky stencil.  You could use vinyl, too.  I did a sticky stencil so I can use it again.
You can use any paint for this project. Just make sure that both colors are the same type of paint {e.d.g.,spray paint, house paint, and tole paint}

Start out by painting ALL the wood white.  ***I had a craft fail {pictured}, so learn from me…paint the WHOLE sign because I didn’t and you can kinda see where I painted it.i PHONE PICS 2012 1121Next apply your stencil or vinyl.i PHONE PICS 2012 1123 Finish off by spray painting the whole sign again.  Remove your stencil and let it dry.i PHONE PICS 2012 1189 These are great to use for any occasion.

Leave a comment

Filed under Decorate Everything, Design Team, Seasonal

Snowflake Windows by Kaysi

Hi!  It’s Kaysi from Keeping it Simple.
Taking down Christmas this year made my house look so bare.  I had the tree right in front of this window and when I took it down, it was so boring.  I just had to do something with it.   I love the look of snowflakes, they are just so pretty, so I just took some white vinyl and cut out a bunch of different snowflakes and put it onto my window.
snowflakes (1)
I love how they look on my window.
snowflakes (2)
snowflakes (3)
Thanks for having me today!

1 Comment

Filed under Design Team, Home Decor, Kids Crafts

Using Vinyl as a Stencil – Polka Dot Mirror

Have you seen these mirrors at Ikea?  They are $1.99.  Can’t beat that, right?  I bought a few, decorated one, and added it to my Valentine decor.

I started out by cutting polka dots out of vinyl using Cricut – craft room.  I removed all the dots and used the leftover vinyl as my pattern.  Then I wrapped it around my frame.

mirror 1

I painted my frame with tole paint.  *This pic doesn’t show the the edges painted – I went back and painted them because it looked a little unfinished.

mirror2

When the paint dried I pulled off the vinyl and then sanded the whole frame to give it an aged look.  

Mirror

Now think of the other shapes and designs you could do!  If you wanted you could remove the mirror and make it a picture frame.
For more DIY projects be sure to visit Staci over at The Potters Place

Leave a comment

Filed under Decorate Everything, Design Team

Winter Subway Tile by Kaysi

Hi!  It’s Kaysi from Keeping it Simple again.
Now that Christmas is over, it’s time to start thinking about the next three months: winter.  It’s a hard time and sometimes depressing, so I like to decorate for it with bright turquoise and red and try to make the best of it.  One of my favorite things to use with vinyl are tiles.  They are so inexpensive, so easy to use and look great.  One of the best parts is that you don’t have to paint them, they are just ready to put some vinyl on them.
With a 12×12 tile, I made some winter subway art with all the things that remind of me winter.
winter tile (1)
I just love the colors together!
winter tile (2)
It was super easy to make, I have one for every holiday!
Thanks for having me again!

I would love it if you followed along.

Leave a comment

Filed under Design Team, Home Decor, Seasonal